Contact Us

T: (425) 481-8175
info@portagebay.com

Twitter   Facebook   LinkedIn RSS

Subscribe to our Email Newsletter
Subscribe to our Bi-Monthly email newsletter
*


* required
Site Search
Tuesday
May312016

FileMaker Layout Tips

I do a lot of fiddling with layout designs for a lot of our different FileMaker projects, and there’s a few useful things I’ve learned, mostly by accident or by blundering around. If you don’t already know these, maybe it will save you some time…

Multiple Inspectors

The day I realized I could have multiple inspectors open was a happy day for me. No more jumping from position tab to data tab, then back again for the next field I needed to review. Just pop open another Inspector window so you can have one for one tab and one for another (heck, if you have a really big screen, why not have one for each?!). To open another Inspector, just select “New Inspector” from the View menu.

Sample Data

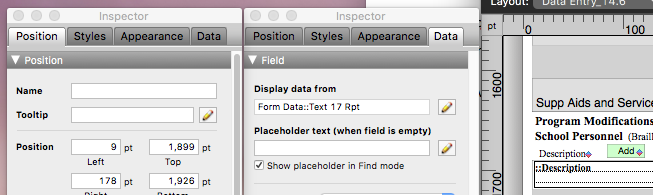
We recently got feedback from our E-Com customers that some of the fields on new forms we had created were not long enough for their student names, or for the names of responsible staff members. We thought we had made the fields long enough – our fairly long field names appeared with plenty of room – but we had miscalculated. Using the Sample Data option in Layout mode when the fields were filled with long sample names in Browse mode revealed how we needed to rearrange and lengthen these fields. It was so much easier to do with the sample data visible in Layout! It may be found under View > Show > Sample Data.

Hover

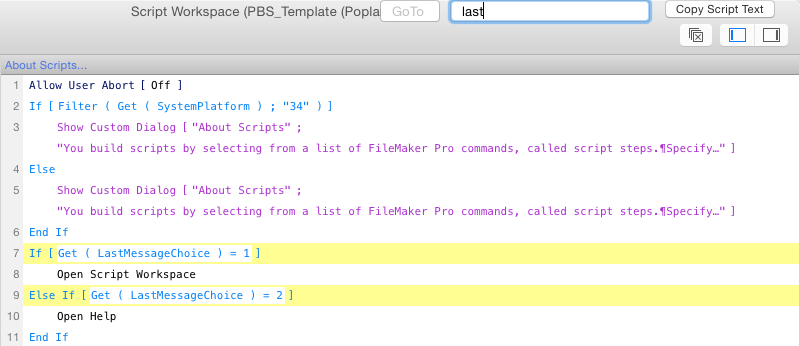
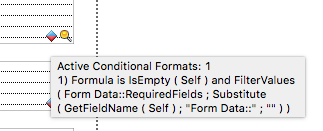
I love the hover function introduced in FileMaker Pro v14! Now I can see what any badge is doing for us without having to dig. It includes any relevant script names. Just hover your cursor over the badge and voila. It tells what conditional formatting, what script trigger, what script, you name it.

Resizing Merge Fields

The Position tab of the Inspector allows you to resize merge fields to better fit the data inside rather than the names of fields – this is really great when you have very long field names with very short data and you need to place other elements around it. Select the merge text area and simply change the width of the field. Showing sample data here can help, as well.

~Alanna Clare

Tuesday
May102016

FileMaker 15 Released

Today FileMaker Inc. released FileMaker Pro and FileMaker Server 15. This is the first release since they announced a new annual release schedule last year, so presumably we’ll see FileMaker 16 approximately a year from now.

FileMaker 15 has a number of interesting new features. I’ve picked out a few features that seem most useful and highlighted them below.

‘In App’ Software Updates
You no longer have to download an updater to keep FileMaker 15 current. The app will simply prompt you to perform the update similar to the way app updates work on an iPhone.

Script Undo
The script workspace now allows multiple levels of undo and redo. This will make it easier to change your mind and undo the last 5 minutes worth scripting changes.

Security Improvements
A number of areas in FileMaker have been updated to allow you to work more effectively with 3rd party SSL certificates to enhance the security of your applications.

iBeacon Support
A new script step enables FileMaker to access iBeacon information in the nearby bluetooth environment. This could allow your FileMaker app to do all kinds of interesting things based on its proximity to an iBeacon. Examples might include automatically displaying the contents of a container that you are nearby or displaying additional information about a product that you are standing in front of.

Truncate Table
This won’t necessarily be useful to all people, but the new Truncate Table script step will be very useful in some situations. In my brief testing, the 'Delete All Records' script step cleared out a table with 117,000 records in 5 minutes and 10 seconds. The new 'Truncate Table' script step did it in 14 seconds.
~ John Newhoff

Monday
May092016

VR Hackathon 2016

I recently attended the Virtual Reality (VR) Hackathon 2016 in Seattle. Although I ultimately didn’t work on a very exclusive “VR" hack. I got to meet a lot of interesting people, look at some really cool VR tech, and learned how to hack the Amazon Echo.

The Seattle VR Hackathon 2016 ran the 3rd weekend in April at the University of Washington. It started Friday night and ran until Sunday afternoon.

During the Hackathon Friday night mixer, we formed into groups. The group I joined consisted of three people. After forming the group, we began to decide what we would do for our hack. One of the back-end developers in the group wanted to do something with the Amazon Echo hardware. The other developer and myself wanted to do data visualization in VR. We tossed around several ideas and decided the Amazon Echo, with the use of its AI, named Alexa, would be a great utility to assist users while immersed in VR. Unfortunately, this meant that the data visualization would need to wait. The clouds slowly parted and the plan materialized. We would use Alexa as our personal assistant while in VR.

Because you can become so involved in the VR world with goggles on, you need a connection to the real world in order to do things like order a pizza, call your mom, or text your friends to join you in a game. The idea we had was a utility function that would allow you to send communications to the real world without interrupting game play - to provide you the ability to send your friend a text message and tell him/her to come join you in the game, by simply asking Alexa to do it. Once the plan was set, we parted for the night.

Saturday morning we met up again, and after a primer tutorial by the Amazon team, we confirmed that the Echo would work great for our project. We got started putting the pieces of the puzzle together. In order to accomplish it we would need to use a few different services.

  • Amazon Echo for voice interaction. Amazon Echo uses an AI and responds to the name Alexa.
  • Amazons AWS Lambda for handling the logic and programmatic responses to our requests. AWS Lambda is a serverless compute service that runs your code in response to events and automatically manages the underlying compute resources for you. You can use AWS Lambda to extend other AWS services with custom logic, or create your own back-end services that operate at AWS scale, performance, and security.
  • Twilio for making telephone calls and sending text messages.  Twilio allows software developers to programmatically make and receive phone calls and send and receive text messages using its web service APIs.

By creating a set of what is termed as "Alexa skills," we could trigger programmed events to be passed using speech recognition from Alexa and get scripted interaction with people in the real world. The functions called by "Alexa skills" were handled by the AWS service Lambda. Using Lambda, we could write functions in node.js, python, or java. The functions would make web services calls to Twilio. Using the Twilio API, we were able to write scripts to make the telephone call or send a text message. Once the person received the phone call and text, the Amazon Echo would respond back to the user in a nice voice with a programmatic response like "message sent."

By the end of Saturday we had a working prototype where a user could say out loud “Alexa, call John!” and immediately the user would receive a text message confirming the call had been sent. Alexa would then respond “Done!” and the person “John” would receive a telephone call, on his cell phone, from a Twilio robot telling him the words we had programmed it to say. With a little knuckle grease, some refreshers to node.js, a few facepalms, the pieces of the puzzle weren’t that difficult to put together.

The last day of the Hackathon came and we presented to the judges and other hackers. As with many of the hacker events, there were a bunch of attendees, which made 24+ teams and some really good hacks. Our hack only loosely fit in with two of the six categories, and we didn’t win in either of those categories. Although we didn’t win any prizes, we had a great time and we learned some valuable skills that I will definitely use on other projects. All that said, it was a lot of fun and I would do it again.
~Xandon Frogget

Thursday
Apr282016

Using FMP Protocol – the Good and Bad

Recently I worked on a project where the goal was to create an opener file that would run a script to determine which file to log into based on the user’s credentials. The launcher file would then open that correct file and close itself.  I determined the best way to achieve this goal was to use FileMaker Pro Protocol

The protocol format is intended to open shared or local files but it also allows you to run scripts, pass parameters and set local variables. The major benefit of using it this way is to avoid having to create external file references to the files where I want to run the scripts. This way I load the URL with the parameters I need and then use the Open URL script step to run it. 

Example:


One of the difficulties about using the protocol is the strictly defined format. I made a mistake in my URL and left out a “?” and there is no way to debug it. I had to stare at it for a while to see where I had missed a character. I found a module on Modular FileMaker which is basically a custom function that takes the different parameters (user name, password, host, file, script, parameters, variables) and then generates the formatted URL. I still highly recommend using FMP Protocol where appropriate. I’ve summed up some pros and cons below.

Pros

  1. No need to add extra file references
  2. FMP URL scripts run with debugger
  3. Quick and easy to implement

Cons

  1. Strict formatting of URL can be difficult to debug
  2. On Windows using IE as the default browser limit URL to 2,083 characters  (on the Mac using Safari it is 80,000)
  3. Local variables set using the URL can appear to pop up in a script instead of being explicity initialized. To work around this you can either add comments at the top of the script or run additional set variable script steps to re-initialize them.

~Kate Waldhauser

Monday
Apr252016

MBS Plugin Dev Highlights

Like many other FileMaker developers, I have gone through my fair share of plugins over the years of FM development. Some extend FM functions, some enhance the debugging process, while others are multipurpose tools for FM development. One multi-tool in particular is the MonkeyBread Software Plugin, which adds over 3700 functions that greatly extend the default FileMaker functionality. These functions range from additional libraries, SQL Connectivity, extending PDF capabilities, barcodes… the list goes on. I have been using the MBS plugin for quite some time, but the most recent iterations add some notable features, thus this blog post of my 3 most used MBS plugin functions.

First, there’s syntax coloring. For as long as I can remember, syntax coloring in FileMaker has been one of the most requested features by developers. In FileMaker 14, some syntax coloring was added to the new-and-improved Script Workspace, but the MBS plugin enhances the coloring within the Script Workspace and extends that to calculations and the debugger.

In version 5.4, they added the functionality to search within both the Script Workspace and relationship graph. After years of developing with other IDEs, this was another long sought feature for the FileMaker platform. The plugin adds a small search field in the top-right of the Script Workspace window. When text is entered, each line of the script containing that search value is highlighted. There is one small limitation in that the search is limited to the viewable area in side the Script Workspace. For example, if a defined variable calculation extends the width of the viewable workspace, the MBS search will not “see” that text. The search within the relationship graph performs in similar fashion. When text is entered the search field, located at the bottom-right of the window, it not only auto-completes based on the existing table names, but also navigates to the table in question.

Last, and most certainly not least, is the “Copy Script Text” button, located at the top-right of the Script Workspace. This button takes the viewable contents of the current script in the Script Workspace and copies it as text to the OS clipboard. From there, you can do with it as you wish. For me, I use it to paste the script into another script editor like TextMate or TextWrangler, which allows for more complex searching, editing, or what have you. It’s especially helpful when searching through a number of cascading scripts. 

There you have it. My 3 most used features of the MBS plugin. The plugin has innumerable uses, so I encourage you to give it a whirl and share your thoughts!

~Joe Ranne