FileMaker Layout Tips
 Tuesday, May 31, 2016 at 3:59PM
 I do a lot of fiddling with layout designs for a lot of our different FileMaker projects, and there’s a few useful things I’ve learned, mostly by accident or by blundering around. If you don’t already know these, maybe it will save you some time…
Multiple Inspectors
 The day I realized I could have multiple inspectors open was a happy day for me. No more jumping from position tab to data tab, then back again for the next field I needed to review. Just pop open another Inspector window so you can have one for one tab and one for another (heck, if you have a really big screen, why not have one for each?!). To open another Inspector, just select “New Inspector” from the View menu.
Sample Data
 We recently got feedback from our E-Com customers that some of the fields on new forms we had created were not long enough for their student names, or for the names of responsible staff members. We thought we had made the fields long enough – our fairly long field names appeared with plenty of room – but we had miscalculated. Using the Sample Data option in Layout mode when the fields were filled with long sample names in Browse mode revealed how we needed to rearrange and lengthen these fields. It was so much easier to do with the sample data visible in Layout! It may be found under View > Show > Sample Data.
Hover
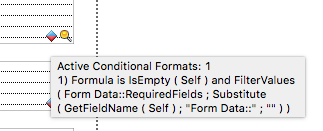
 I love the hover function introduced in FileMaker Pro v14! Now I can see what any badge is doing for us without having to dig. It includes any relevant script names. Just hover your cursor over the badge and voila. It tells what conditional formatting, what script trigger, what script, you name it.
Resizing Merge Fields
The Position tab of the Inspector allows you to resize merge fields to better fit the data inside rather than the names of fields – this is really great when you have very long field names with very short data and you need to place other elements around it. Select the merge text area and simply change the width of the field. Showing sample data here can help, as well.
~Alanna Clare
 Layout tips in
  FileMaker


